Creating the perfect animation video can sound like a
challenging task. Whether you do-it-yourself or have access to
an in-house team, without a clearly defined process, creating
even a simple animated video can still be a daunting task.
This can be even more challenging if you are a Newbie. But
don’t worry.
We have put together a 6 step guide to help you jump over the
hurdles and create animated videos like a pro!
✔Step 1: Write a stellar video script
✔Step 2: Create a Storyboard for your animation video
✔Step 3: Choose your animation video style
✔Step 4: Animate your video
✔Step 5: Add a suitable background music
✔Step 6: Narrate Your Story
♓Step 1: Write a stellar video script
Just as a building’s blueprint is the foundation for its
construction, so too is the script for your animation video. As
the scriptwriter, you should essentially decide what will appear
in your video.
While this can be intimidating at first, with a little bit of
homework, things can be very easy.
WRITE A BRIEF : TO HAVE A a CLEAR PURPOSE AND DIRECTION FOR YOUR VIDEO
Before you start writing a script for your video you need to
write a solid video brief. This will help you determine your
objective, target audience and the core message of your video.
Basically before scriptwriting, you should have a clarity on,
*Why you’re making this animated video?
*What it needs to achieve?
*Who is your target audience?
*What action should viewers take after watching, and
*What is the core message of your video?
*Convert your core message into a simple story*
Any animated video you create will have one or more core
messages that you want to communicate to your audience. The
challenge lies in converting that core message into a simple
and short story that will engage your audience.
💮Make sure your story has these 3 elements:💮
⏳The hook: This is the most important part of the script. It’ll be
the first 8-10 seconds for a 1-minute video. It will decide
whether your viewers will stay or bounce. You should give
some compelling reason for them to get hooked
⏳The patty: This is the main part of your video. This is where
you get to the meat of your video. Make sure it lives up to your
hook. Many make the mistake of destroying their video after a
great buildup.
⏳The CTA: This is the final part of your video. If your hook and
patty were good, many viewers will reach the CTA part. This is
where you lead them to take some action.
These steps have helped our videos outperform all our
competitors’ videos very easily. We are very confident that it
will help you do that too.
♓Step 2: Create a Storyboard for your animation
video
A storyboard plays an essential role in any animation video
creation process. It will give collaborators and decision-makers
an idea of how your final video might look even before you
start creating it.
For beginners, creating a storyboard will help predict whether
the concept of your video will work or not. It will give you the
opportunity to tweak your visuals and script in order to create
the most compelling animation video possible.
Here’s how you can create the perfect storyboard for your
animation video:
A storyboard is more like a comic strip of your animation video
and the purpose of creating one helps organize your video
scene by scene.
A sample storyboard will look like the one below,
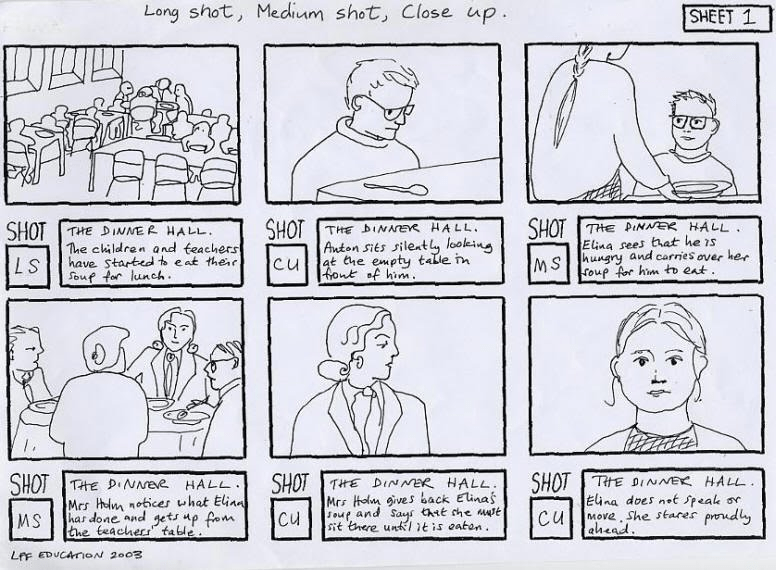
Use the rectangular boxes to represent scenes in succession
and the smaller boxes below to highlight dialogues and actions
if any. The smaller box can also be used to plan the
animations or camera angles of your video.
*Use online storyboarding tools*
Creating storyboards the traditional way can look messy if your
sketching skills are mediocre. There are online alternatives
though.
Many use Animaker for this purpose. Though it’s actually a full
end animation tool, its simple drag & drop interface makes
creating a storyboard a breeze.
Here’s a sample storyboard created using Animaker,
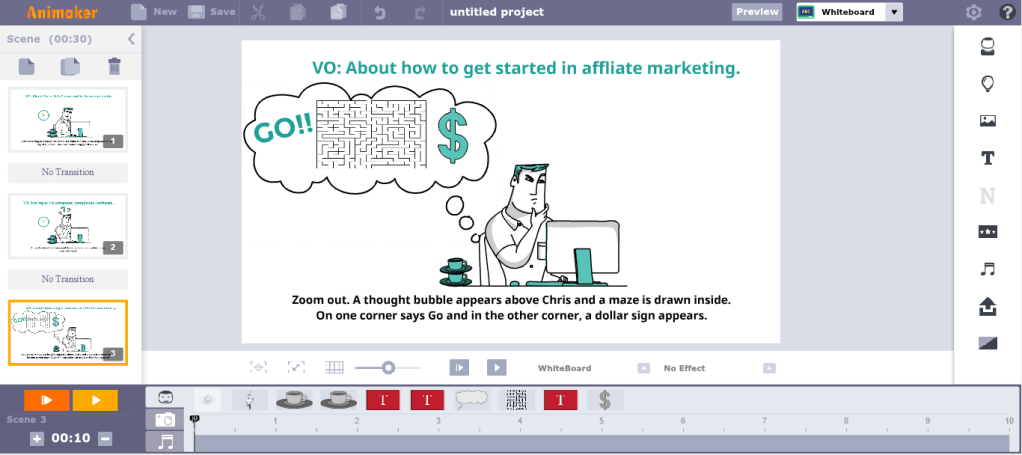
Later on, you can even convert your storyboard into an
animated video!
♓Step 3: Choose your animation video style
There are different types of animation videos you can make,
but not all the styles will suit the needs of your business.
Each style has its own pros and cons. If one looks fun and
creative then the other might set an inspirational or serious
tone.
Here are the most common styles of Animation videos you can
make:
🔎2D animation videos
2D animation is the most commonly used animation video
style. It is created by sequencing consecutive images in a
gradual progression of steps to simulate life-like motion similar
to the traditional form of animation.
This type of animation will suit both B2B & B2C audiences. As
your audience grew up watching animated cartoons in their
childhood, 2D animation videos instantly develops a strong
emotional connection with them, thus increasing viewer
engagement!
🔎Whiteboard animation videos
Whiteboard animation videos are most suited for creating
product explainer videos. If done the right way with a
compelling script and CTA, you can get more sales
conversions.
It simulates the effect of characters and objects being created
in front of a viewer on a plain white board. This immediately
draws user attention and remains in their memory for a longer
duration. Furthermore, there are 4 different styles of whiteboard
videos that you can make; namely blackboard, notepad, glass
board & stitchboard videos.
Whiteboard videos are also a perfect fit for the education
industry, as teachers usually use a marker and a whiteboard to
explain complex ideas to their students.
🔎Typography animation videos
Animation video using typography is a technique mixing motion
and text to express ideas in the form of video animations. This
type of video is generally used for creating lyric videos for your
music tracks.
It’s the ideal video format to use when you want your viewers
to focus on the words being presented. Moreover, it usually
takes very less time to create one..
🔎Infographic animation videos
Infographic animation videos can be used to convert your
boring data into engaging stories.
These kind of videos are more eye-catching as they pack
themselves with lots of animated charts, numbers, graphs and
other visual content that naturally draw viewer attention.
If you are someone who still presents your monthly sales data
to your boss using a spreadsheet, you should definitely give
infographic animation a try!
🔎Handcraft animation videos
Handcraft Animation Videos are a simple yet effective way to
explain a concept. So, they can be most suited for explaining
complex ideas.These videos simulate the effect of objects being moved
around the scene by a hand and thus are naturally attention-
grabbing to the human eye.
These are the most common types of animation videos used by
brands around the world. You can also go with a hybrid version.
You can mix & match these video styles to make your videos
even more engaging.
♓Step 4: Animate your video
Deciding how to animate your video can be a challenge as
there are a lot of options to choose from. Each option has its
pros & cons.
Here are a few ways by which you can create an animation
video,
**Hire an in-house team:
This option will suit your brand best if you plan on making a
series of animation videos and have access to a huge
marketing budget.
Firstly, You’ll need a team of scriptwriters, animators and
voice-over artists.
Then you’ll have to provide them access to the necessary
equipment and software. While it’s a one-time purchase, it can
easily cost you tens of thousands of dollars.
Moreover, the quality and production time per animation video
will solely depend on the capability of your in-house team.
**Outsource to an animation studio:
Outsourcing will suit you best if you’re only planning for a one-
time animation video project. There again comes the debate of
choosing the right animation studio and the question of how
much they would charge.
Firstly, you’ll have to consider the timeline for your project and
the budget you have in-hand. When it comes to outsourcing,
the quicker you need your video, the more you have to spend!
In this case, the quality of the video will depend on how well
you’ve communicated your idea to the studio and how well they
have understood your brand.
**Do-it-yourself:
When you’re on a lean budget but at the same time need a
killer animation video, DIY apps are your best friend!
Yes! You can do it on your own. No! You don’t have to watch
“how-to” videos of sophisticated software on youtube.
All you need is a PC/Mac and access to an internet
connection. Sign up for a DIY tool and start creating animation
videos from the comfort of your web browser.
With Animaker, you can create 2D animations, whiteboard
videos, infographic videos, handcraft videos, typography
videos, and even create your own GIFs. You can make use of
90+ templates and the World’s largest animation library.
♓Step 5: Add a suitable background music
Adding a background music to your video is like placing a
cherry on top of the cake. Without it, something will be
missing!
However, finding the right music track among the millions
available online, can be tough, Again most of the music you
find online is not copyright free; the last thing you want is
having someone sue you, for using their music track without
permission!
**Here are a few things to remember when choosing a
Background music:
⏳Think of the emotion you want to evoke:
Ever wondered why some songs make you sad? Music can
evoke emotions. It can set the mood of your video. So decide
how you want your viewers to feel after they watch your video.
⏳Understand your buyer persona:
Different people have different taste in music. It also varies
with age. Most kids like funny and happy music, while most
teens prefer metal and rock.
⏳Make sure your music is labeled for reuse:
Source music only from royalty-free sites. Contact the music
creator and make sure they are ok with it. You can also legally
purchase music from third-party sites.
⏳Don’t stick with one:
After you select a few music tracks, apply them one-by-one to
your video and see which suits your video the most.
♓Step 6: Narrate Your Story
Now we have come to the last step in creating an animated
video. You have spent the entire time perfecting your animation
video in every way possible.
But which is more powerful? Telling your story in your own
words, or adding lines and lines of text inside your video?
Adding the right voice-over can enhance the video quality. This
can be done in two ways,
✔By hiring a voice-over artist:
You can find professional voice-over artists in freelancer sites
like Fiverr and Upwork. They can provide you with quality voice-
overs for your video. Moreover, they are affordable and promise
timely delivery too.
✔Recording it yourself:
Recording our own voice over can be fun, yet challenging! The
most important part is the equipment. A poorly recorded voice
over is the number one video killer!
Make sure you learn from the experts before starting out.
You can also use advanced text-to-speech apps like Animaker
Voice to create your own voice over .
These 6 steps are just to get you started. Once you create a lot
of videos, these tips will become second nature. Do you have
any doubts that haven’t been answered yet? Please shoot your
questions in the comment section below – We’d love to help
you out!
💮Prosper Ebere💮
visit this site🔎:https://glowinglooks.blogspot.com
